Follow the steps in the app to apply the Accu-Chek SmartGuide sensor. Watch the video below to see how to insert the sensor, or continue reading for step-by-step instructions.
Watch the video tutorial to apply your CGM sensor

Step-by-step guide to applying the sensor
The Accu-Chek SmartGuide sensor must be placed on your skin correctly for continuous, accurate glucose readings.
Before you apply the sensor
To get the longest wear time for your new sensor, make sure your skin is fully prepared.
- Always have alternative methods for testing your glucose available. If you lose your mobile device or in case of a system malfunction, switch to an alternative method for testing your glucose, like a blood glucose meter.
Open the mySugr app to view step-by-step instructions
After downloading the mySugr app, go to the Connections, tap Accu-Chek SmartGuide, then Connect, and then How to apply the sensor. When you are ready to apply the sensor, tap Next.

You will need:
- The mySugr app
- A new, unused Accu-Chek SmartGuide device (pictured on the left.)
- Alcohol wipes to disinfect the application site.
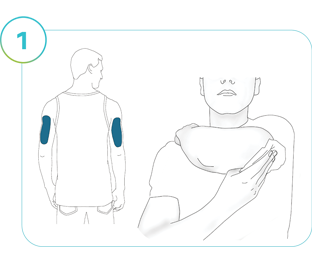
Step 1
Select the back of your right or left upper arm to apply the sensor. If the application site is hairy, shave it. Disinfect the application site with an alcohol wipe to ensure clean, oil-free skin, and let it air dry completely. Stay at least 7.5 cm (3 inches) away from insulin injection sites. Avoid recently used application sites, as well as scars, stretch marks, liver spots, lumps, or blood vessels.
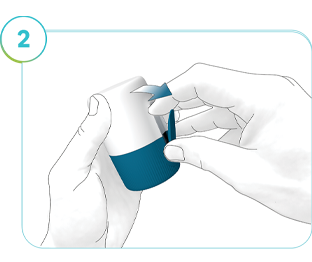
Step 2
Take a close look at the packaging and product to ensure they're not damaged or tampered with. If the pull tab is sticking out before you use it, the sterile barrier is broken. Discard the damaged product and grab a new sensor. Slightly flip the pull tab (A) open. If the pull tab has already been opened before use, discard the device and use a new one.

Step 3
Do not press on the device. Turn the twist cap (B) to open the sterile barrier. You will feel a slight resistance and hear a cracking sound. Pull the twist cap from the applicator (C).
Don’t touch the needle inside. Don’t put the blue twist cap back on after you have removed it, and don’t discard it yet.

Step 4
Place the hand of the disinfected arm on your opposite shoulder. This helps to tighten the skin. Reach under your arm and place the applicator (C) on the application site. Hold the applicator by the external housing. Make sure the entire bottom of the applicator is flat against your skin and press down firmly.
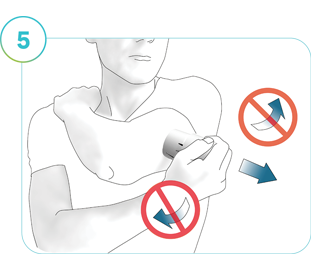
Step 5
Remove the applicator in the same direction without rotating or wiggling it. Swipe over the adhesive pad firmly with your finger to make sure the adhesive pad is properly attached.
You can wear the sensor for 14 days.
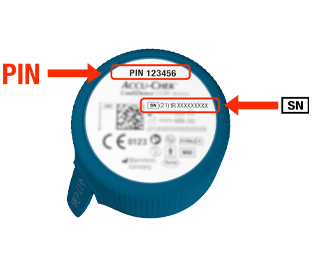
Important Info
After you’ve applied the sensor, follow the pairing instructions in the app. You’ll need the PIN code printed on the applicator's twist cap — do not discard it until the pairing is complete.
All done! Next, see how to pair the sensor with the mySugr app.
How helpful did you find this training?
Continue Training
Previous step
Accu-Chek Newsletter
Stay informed about diabetes
Get diabetes management tips and news delivered right to your inbox.